Google Co-Lab and PyTorch
- Haitham Bou Ammar

- Feb 13, 2019
- 4 min read
Updated: Feb 22, 2019
Recent advances in machine learning, especially those in deep learning, have been enabled by innovations in computer hardware that allowed for faster and more efficient training of extremely large industrial-scale models. Learning at scale, enabled applications of deep neural networks in every aspect of society and technology. Applications include personalised medicine, self-driving cars, real-world logistics, voice assistants, automatic translation, and finance to name a few.
Unfortunately, the personal use of state-of-the-art hardware to train machine learning models can become very expensive for independent researchers who would like to implement their own ideas or attempt to explore the growing body of machine learning algorithms. Rather than racking thousands of dollar bills, I found that Google Co-Lab provides a simple, user-friendly, efficient, and free alternative. Yes, it is free!
Installing & Configuring Co-Lab
Google Colab offers a Tesla K80 Graphical Processing Unit (GPU) and also a Tensor Processing Unit (TPU). This framework allows the usage of jupyter-like notebook with the same extension of .ipynb. The Colaboratory app is just another extension that you can add to your Google drive enabling access to the GPUs and TPUs. Google Co-Lab supports Python 2.7 and 3.6 and allows easy installation of python packages like PyTorch, TensorFlow, and others. In what comes next, I will detail a step by step guide for using Co-Lab's GPUs to perform a simple regression problem in PyTorch.
In Co-Lab the root directory is actually your Google drive folder. So the first thing to do is to connect to your Google drive. To do so just follow the following steps:
Get connected to your gmail account
Press on the app's icon (dotted square top-right corner)
Go to Google Drive
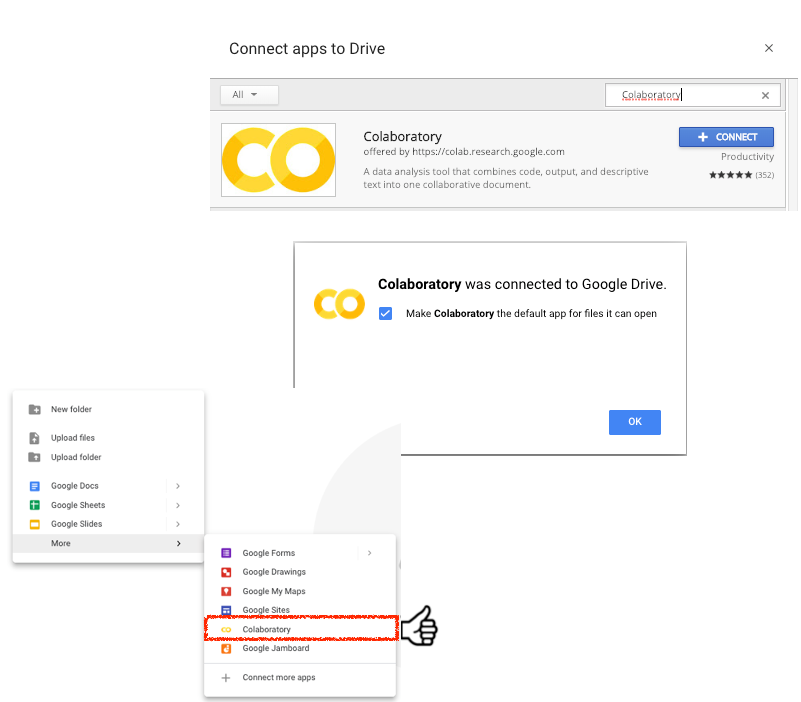
Having connected to your Google drive, now it is time to install the Co-Lab extension. The Co-Lab extension is just another app, which can be easily installed using the following steps:
Right-click anywhere in Google drive
Go to "More"
Click Connect More Apps

When clicking connect more apps, you should get a screen that allows you to install more apps. Now, we can install colaboratory as follows:
Search for colaboratory
Press connect
Press OK after being prompted of successful connection
Right-click in Google Drive
Go to More
You should see that colaboratory has been installed installed

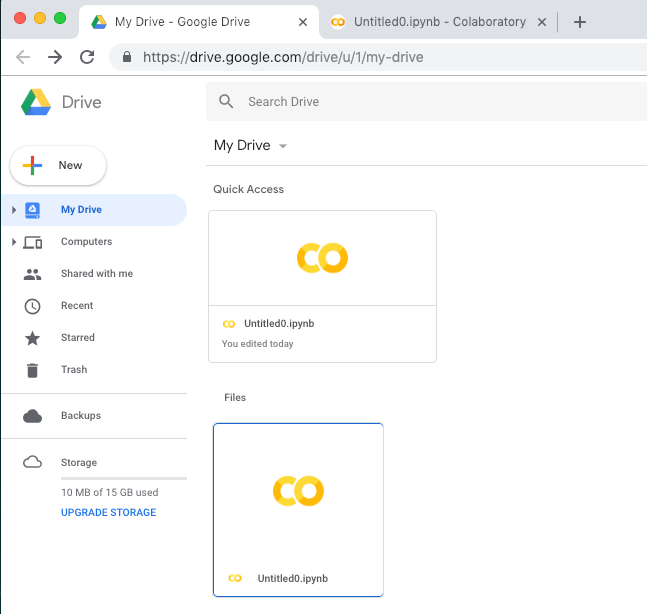
Having installed colaboratory, we are now ready to run the application allowing us to start using the free GPUs available on Google cloud. When pressing on the colaboratory app, Google performs 2 modifications allowing us to start.

The first is launching a new browser tab that includes a jupyter-like notebook, and the second is creating an .ipynb file in your Google drive folder. It is worth noting that there are only two browsers supported to operate Co-Lab. The first is Google Chrome, while the second is FireFox. For more information, feel free to consult the frequently asked questions on: https://research.google.com/colaboratory/faq.html
Colab allows various features for your work on machine learning using Python 2 or 3 to work with GPUs or TPUs. Of course, working only with CPUs is also possible.

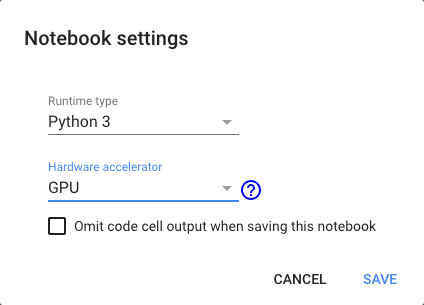
It is easy to see the available settings for you by using the .ipynb tab. Namely, if we are to press Edit >> Notebook Settings in our Untitled0.ipynb tab, we would get a screen resembling the figure on the right. Here, there are a couple of options to choose from including the type of Python to be used, as well as the hardware accelerator. I decided to choose Python 3 with a GPU hardware. As mentioned earlier, Co-Lab also supports TPUs, but that is a topic for another post.
Connecting Google Drive:
There is one remaining step before being able to run PyTorch in our Notebook that we need to handle. As many of you already know, machine learning algorithms require a data-set that exhibits the hidden relation your algorithm tries to discover. For instance, in regression a data-set of inputs and outputs are provided and the goal is to learn a model, hidden in the data, that can generalise unseen input data points. To code this task, we require a place to store our data and a way for our notebook to interact (e.g., retrieve) with this data. Since we are using Google drive uploading and storing data is easily achievable (e.g., can simply be done by dragging and dropping a file). Having the notebook interact with your Google drive, however, is a more challenging task. Fortunately, Google has already provided us with the pieces of code that we need to run to authorise and authenticate this process. There 4 steps needed here:
Installing a Drive FUSE Wrapper
Generating Authentication Tokens
Generating Credentials for Fuse Library
Mounting Your Google Drive
Google has already provided these codes. Go ahead and copy-paste the code here into your notebook. After copying these, run each cell. You will realise that some cells ask you to copy a link in your browser to get, e.g., authentication tokens. After getting these make sure to enter the code back in the space allocated in the cell and pressing enter.
Having mounted your Google drive, now you are to commence with Python coding using the notebook settings that you have provided at the beginning (e.g., Python3 with GPUs). Interestingly, many python packages already come installed with Co-Lab, these include numpy, matplotlib, among others. PyTorch, however, is not pre-installed with Co-Lab. Therefore, to get started with using PyTorch, one step last step is needed. This can be found on the last cell here. Go ahead and copy-paste this code to a new cell in your notebook and run it.
Now you are good to go! In the next post, we will walk through a simple regression problem on artificial data using Co-Lab's GPUs and PyTorch. Stay posted!
This post has been made available through the help of other blogs and information scattered on Google. Here are some useful links:
Rasul Tutnov (Lots of discussions, proof-reading, and coding)
Safouane Chergui Blog (Lots of material has been adapted from there)
Anne Bonner (Lots of material has been adapted from there)
[i don't own any of the pictures (including cover) in this post]

Of course, Glad you liked it.
Thank you for sharing Haitham!!! This is awesome, I was not aware of Google Colaboratory ...